Setting Up a Database for Marketing Compliance
After your IntelligenceBank platform has been configured with Marketing Compliance capabilities by your Admin, you may need to set up a new database to use these features. This guide will help you create and configure a database form with Marketing Compliance enabled.
Before You Begin
Ensure you have:
- Appropriate permissions to create or modify database forms
- An understanding of which Filters will be used for risk reviews
- Knowledge of your organization's workflow requirements
Creating a New Database Form
- Navigate to Admin > Databases/Forms
- Click Create New or select an existing Database to add the capabilities to
- For new forms, select either Single or Staged type based on your workflow needs
- Click Edit Form Template and configure the form settings as needed
For detailed instructions on creating general database forms, refer to our help article: Creating a New Database Form Template
Adding Risk Review Filter Fields
Some Filters determine which compliance rules are applied to your content, contact your Admin to understand which filters you can use:
- Add Select Fields to your form for each Risk Filter you want to use
- Set the source to the corresponding filter configured for Risk Reviews
- For multi-select categories, enable the multi-select option
- Check the Allow Select All option if you want you users to be able to Select All options
- These 'Risk Filters' will determine which risk rules are applied to your uploads
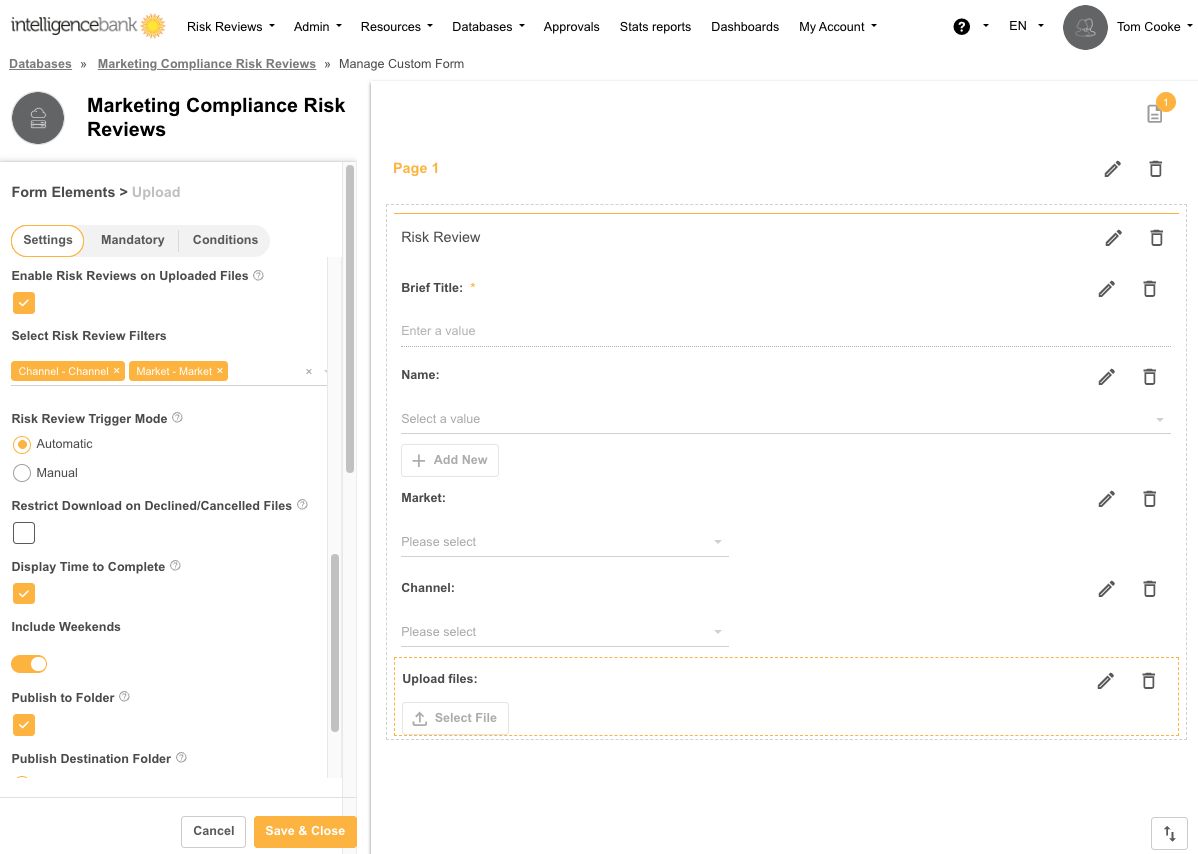
Adding a Marketing Compliance Upload Field
- Add a Multi-Upload field to your form
- You can use 'Risk Filters' from other sections or pages in your form.
- In the field settings, enable one or both of:
- General Markup Comments - Allows users to add comments to documents
- Enable Workflows - Creates an approval process for uploaded documents
- Enable Revisions under Markup Configuration to allow users to add new revisions after reviewing Risk Review comments
- If enabling workflows, configure your approval workflow as needed
- Enable Enable Risk Reviews on Uploaded Files to automatically scan files for compliance issues
- Select which Risk Filter fields should be used for Risk Reviews
- Choose the trigger mode:
- Automatic - Review starts immediately upon upload
- Manual - Users must click the "Risk Review" button to initiate review
- Set file limits as needed (current maximum is 50 files per upload field)
 Best Practices for Form Setup
- Clear Field Labels: Use descriptive labels for Risk Filter fields to help users understand which options to select
- Required Fields: Make important Risk Filter fields required to ensure proper rule application
- Help Text: Add help text to fields explaining how selections affect risk reviews
- Organized Layout: Group related fields together for a more intuitive user experience
Tips for Risk Filter Selection
- Risk Filters directly determine which compliance rules are applied to your content
- When users create a record and select multiple Risk Filter values, more rules may be triggered, resulting in more comprehensive reviews
Next Steps
After setting up your database form, you're ready to:
- Create new records in your database
- Upload marketing materials for compliance review
- Review identified risks
- Collaborate with team members on addressing compliance issues
For any questions about advanced configuration options, please contact your Admin or support@intelligencebank.com.
Was this article helpful?
That’s Great!
Thank you for your feedback
Sorry! We couldn't be helpful
Thank you for your feedback
Feedback sent
We appreciate your effort and will try to fix the article